


How do I create a pattern to cut from a found graphic?
In today's tutorial you will learn how to prepare a file for the cutting plotter and create your own graphics to cut from found raster graphics - JPG, PNG, GIFF. We hope it will speed up your work and prove helpful in creating your own projects.
3/19/2024
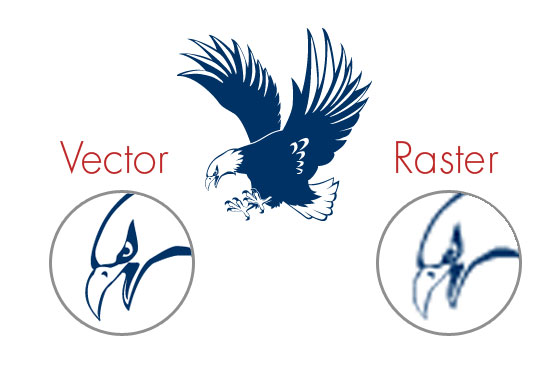
What is raster graphics?
This is most of the images you will find on the Internet - photos, coloring pages, graphics. Most often these are files with extensions: JPG, PNG, GIF, PSD or TIFF. When enlarging such an image, you will notice a loss of quality - visible pixels.

The graphic comes from: http://4.bp.blogspot.com/_CBJsy-gk_JQ/TJfl6hMUOiI/AAAAAAAAADQ/3c9C0MnkbSs/s1600/vector-vs-raster.jpg
Plotters, unfortunately, do not cut this type of graphic and when you import it into the program in the SEND tab, you will see that only a rectangle would be cut out, along the edges of the image. How to make a graphic for a plotter? Fortunately, converting such a graphic into cut lines (vector graphics) is not difficult. This is done with the Outline tool, which you will learn more about in this tutorial!
How to make a graphic to cut out?
1. Open Silhouette Studio, then press File -> Open in the upper left corner and select the image to be reworked. You can also drag the graphic into the program to import it.
2. In Silhouette Studio version 4.4, automatic outlining of PNG files with transparent backgrounds, for example, was introduced. Before you transform graphics by yourself, check if the program didn't do it for you! Open the SEND tab. If the red cut line follows the contour of the shape you don't need to do anything, but if you only see a red rectangle you need to manually transform the graphic.
3. Open the SHAPE tab from the right side menu.

4. Select Select outline area and use it to draw a rectangle covering the entire image.

5. Use the Threshold slider to cover the entire graphic in yellow.

6. The red lines that appeared around the graphic are the cut lines by the plotter. You can now remove the graphic from the design by clicking on it and using the Delete key.
7. The penultimate step in preparing the design to be cut from the graphic is to select the SEND tab (the first tab on the right in the upper right corner). It contains the settings for cutting. Select the appropriate material and blade or set the cutting parameters yourself.

8. If you have a prepared design, the plotter is on, connected to the computer via USB cable or via Bluetooth and to the power, click SEND!
9. It is also a good idea to save the design in the library for repeated use.
I hope you find the instructions useful and that they will allow you to create many new graphics to cut and projects with the plotter! Once you know how to create a pattern to cut from a found graphic use it with the Print&Cut technique and also learn how to add Polish characters to the font to create great designs.
Share this post with your friends!

Newsletter
Join the newsletter and get a 50 PLN discount*
Get access to inspiration and opportunities prepared especially for subscribers.